How To Get a 74.8% Open Rate with Your Newsletter. Email Marketing Made Easy.
February 11, 2015

The right subject line makes all the difference when it comes to your email open rate.
By Maureen McCabe
Although I’ve never given birth physically… I feel that I have now done so virtually!
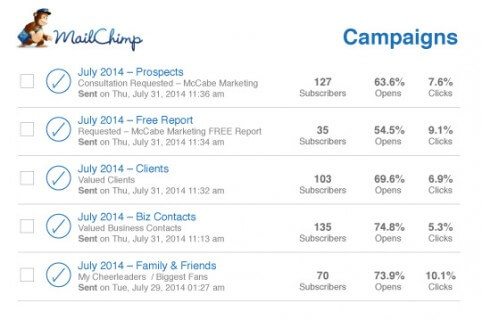
Imagine the thrill I felt when I sent my first email campaign through MailChimp on July 31st and achieved both great open rates (54.5–74.8%) and click-through rates which were through the roof by all measurements (5.3-10.1%). I received dozens of kind comments from readers — so many that I couldn’t respond to them all. However, I did find time to respond to the sales leads I received.
I was overwhelmed and humbled by the laudatory comments and advice to post the newsletter everywhere that I didn’t quite know where to start. To be honest…I was too busy attracting new clients. I closed two new ones on August 13th and one on August 15th!
I was unsure how to post the newsletter across my social media sites, but I did manage to post it on LinkedIn. If you’re not yet subscribed to my email list, or haven’t seen the newsletter yet and want to take a look at it, scroll to the end of this blog to read the special edition for my blog readers!
Interested in finding out how I put together my first email newsletter campaign? Read on!
Step 1: I Created 5 Email Lists
- Friends/family (they’re always great to promote you)
- Clients (active and previous)
- Business colleagues (e.g., partners, networked business contacts, members of my networking group)
- Medium-warm prospects (those I gave a free consultation and it wasn’t a fit or in their budget)
- Prospects (those who had requested my FREE report — 8 Money-Burning Marketing Mistakes that Reduce Profits — and weren’t quite ready to step forward)
This actually took me months to do… like you, I’m a busy small business owner. Although I’m an established Marketing Consultant (over 20 years), I took months to pull the lists together. A special thanks to Aina who helped me upload/format the Excel sheets into MailChimp.
Step 2: Branding
I’ve spent a lot of time on my brand image…from the significant investment in my website, including the original sketching of the banners (not stock art), the four videos, PowerPoint template and more. I couldn’t use one of the many standard MailChimp email templates. Overdrive Design came to the rescue with a completely custom (read: many, many hours) designed email. Alex, Bryn and James… I love you guys. Thanks for making me look great!
Then of course I had to update my website to create a special form to sign up for my email newsletter. Next, I updated the free consultation form and free report form on my website to capture new emails for my subscriber list, asking site visitors for permission to send them marketing materials via email. The boxes were unchecked as I followed CASL (Canada’s Anti-Spam Law) that came into effect this past July.
Step 3: Reuse
Creating the content for my newsletter was actually very easy. I used my most read blog post, which turned out to be the first one that I wrote in December 2011. “Needs-based” selling (communications) skills – it’s not all about you! Homepage writing tips.
Step 4: Tech Support – It Makes or Breaks you
Unfortunately, I’m not the most technologically adept person. And my great IT support team at EasyTech Care weren’t MailChimp savvy either. So, along with Aina’s help, I learned first-hand how easy it was to use. (I’m now just itching to get my next newsletter set up. (Did I mention, if you email me I’ll send you the link to read my first email blast?)
Once you’re INSIDE the newsletter, snuggling up with McCabe Marketing, you can request a free report, free consultation or better yet, why not sign up for the Profit-Boosting Marketing Tips Newsletter and get the next edition delivered right to your mailbox?
Here’s the custom subject line that I found worked really well, and achieved an excellent open rate:
Susan, I’m excited to share…
(Wouldn’t have you clicked as well?!)
Step 5: Metrics
As my home economics (e.g., sewing) teacher Mrs. Nesbitt used to say, measure twice, cut once. So I’ve now spent more time analyzing the results of my first email campaign, which seemed unbelievable to me!
You won’t believe the amount of data that’s revealed about my subscribers in these email reports. I can see when you opened the email, what you clicked to read and which links you visited. I’m now opening the kimono to share some of the results:

Step 5: Unsubscribe
My sister was my first unsubscribe. Margot is four years younger, and although still quite trying at times, I do love her. She was very kind to email me rather than just simply click the ‘unsubscribe’ button. As it would impact my newsletter’s metrics in MailChimp.
With any email list — even if all of your list members have given you their permission to send them email — you will have people unsubscribe or report your newsletter as spam from time to time. This is nothing to worry about, and MailChimp does an excellent job of managing your email list to ensure you don’t send any more emails to these individuals in the future.
That’s it! I now have to get back to tweaking the next edition of the newsletter. Stay tuned to my blog for more email marketing tips!
For more small business digital marketing tips, take a look at these blog posts:
Discover Red Flags by Understanding the Ins and Outs of an SEO Contract – Part 3
Customer Dissatisfaction: 3 Tips to Manage a Crisis. What’s your marketing strategy?
Small Business Social Media Tips: Claim Your Name!
Marketing Companies Toronto | Marketing Agency Toronto
- Marketing Services
- What We Do
- 10-hour Starter Package
- Marketing Strategy
- Marketing Plan
- Attract & Keep Customers
- Website Marketing
- Promotional Marketing & Ads
- Online Video Marketing
- Branding
- Marketing Materials
- Marketing Tools
- Why Choose Us
- Maureen McCabe, Small Business Marketing Consultant
- Small business marketing Toronto
- Help You Grow
- Video Gallery
- Marketing Fees
 Free Consultation
 Marketing Check-up
 Free Marketing Report
 Free SEO Template
 Make An Inquiry


